Sticky Notes - Quick Start
Notes manager
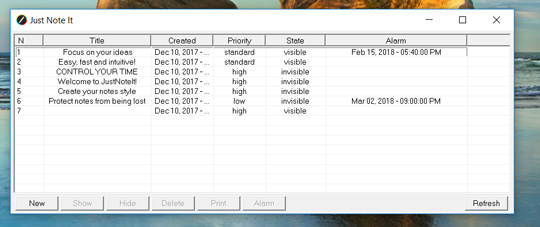
When you run JustNoteIt you will be presented with the Notes Manager window that shows a list of your sticky notes and reminders. When you run the program first time this contains three notes with different priorities: high, regular and low. In the Notes Manager window you can quickly add a new note, show, hide, delete, or print your notes or set an alarm.
If you would prefer to sort your notes and reminders by date, title, priority, state or alarm, you can click the corresponding column to view all of your notes organized the way you need.
To create a new note, simply click the New button. Enter a title for your note and place it anywhere on the screen.
Note's right-click menu
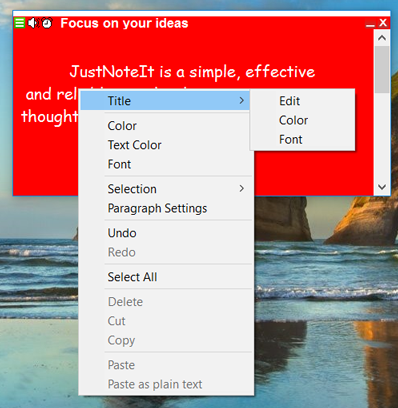
The sticky note's context menu gives a list of actions that can be performed on a note. It helps you easily customize notes appearance and format text.
You can access the note context menu by right-clicking on a note.
Note's menu
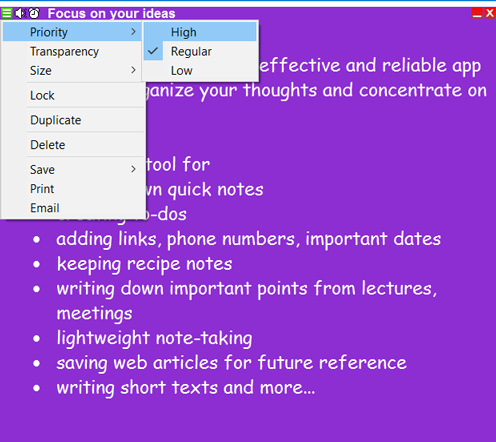
With the Note menu you can quickly access the options and commands you need to work with individual notes
The Note menu can be accessed from each note by clicking on the icon in the upper-left corner.
Get Started with Sticky Notes
JustNoteIt for Windows 7/Vista/XP is a free sticky notes application. You can also try to run the program on older Windows versions.
Using the app is really easy. Once you run the program, you can start creating sticky notes, color, resize, format and customize them anyway you wish, and send notes online.
Learn how to perform some common tasks with sticky notes:
Create a new note
Set a reminder - set an alarm
Format notes
Notes customization
Save a note
Print a note
Organize and find notes
Delete a note
Create a new note
You can create a new note in four ways:
To quickly create a new note, press Ctrl + Alt + N (the default New Note hotkey combination) or double-click on the tray icon next to the system clock

Additionally you can open the Main menu by double-clicking on the desktop icon or right-clicking the tray icon and then select Notes -> New note
You can also create a new note in the Notes Manager.
Once the note is created, it is placed on the desktop. Click in the main part of the note and start typing. Once you have finished typing, you do not need to do anything - simply click somewhere on the desktop. The program will automatically save all information.
The Notes Manager allows you to manage and view your notes. You can access the Notes Manager by selecting Notes Manager from the Main Menu.
You can use
hotkeys for most frequently used operations with your notes:
For example, press Ctrl+Alt+H to hide all the sticky notes on your desktop. To place all of your sticky notes on top of other windows, press
Ctrl+Alt+S.
Changing the appearance of your sticky notes
To change the look of your note, right click on it and then select the desired option (change color, font, etc.)
To resize a note, just drag a sizing edge or corner of the note to make it smaller or larger.
The default sticky notes settings can be changed in
sticky notes settings. Sticky notes default settings include note color, title and text color, font, priority and transparency.
Formatting text in the note
The app offers a range of formatting options.
You can create a
numbered list and
bulleted list, apply the
paragraph settings, change the
color and
text size, ...
Select the text you want to format and use the
hotkeys or the
format options from the right-click menu.
Save a note
All of your sticky notes are saved automatically every 15 minutes while you take and edit your notes. This time interval can be changed in the
Program settings. Also you can save all of your notes manually selecting Save in the Main menu.
Print a note
To print a note, click the upper left corner of the note to open the Note menu, and select Print or you can select the note in the Notes Manager and click the 'Print' button.
Organize and find notes
All sticky notes can be searched and filtered by note's title, note's priority and the date and time of note creation.
Note priority:
As high priority notes are placed above all other windows, it could happen that they overlap other windows and notes. If you do not like it, you can change their priority to standard or low, or just hide them.
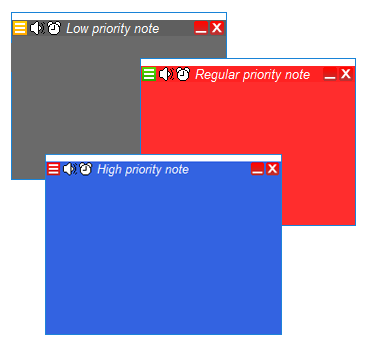
If a sticky note has a standard or low priority, it could happen that they are not fully visible. You can bring them to the top by activating this note (clicking anywhere on this note) or show them from the Notes Manager window.
Hiding notes:
You can hide (close) desktop notes by clicking the 'X' icon.
To hide a group of dekstop notes - select them in the Notes Manage and click the Hide button.
To close all desktop notes, press Ctrl + Alt + H or choose the Hide All Notes in the Main menu.
To show a group desktop notes select them in the Notes Manager and click Show. Use Ctrl + Alt + S - to show all your dekstop notes.
Minimizing notes:
You can minimize desktop notes to display their titles only. To minimize a desktop note, click the 'Minimize' icon in the top right corner.
You can minimize all sticky notes by selecting program main menu -> Notes -> Minimize All.
You can read a note content by clicking on the speaker icon in the note title bar.
Finding desktop notes:
With 'Find' option, you can easily find any desktop sticky note you want.
To delete a desktop note
Select 'Delete' in the note's menu. To open note's menu - click the menu icon in the upper left corner of the note.
You can also delete a note from the Notes Manager.
To delete multiple notes, select them in the Notes Manager and click the Delete button.
If the Recycle Bin option is turned on, deleted notes are moved to the Recycle Bin.

 EN
EN